


Today, we're building a two-factor authentication GitHub workflow automation with a browser we have on our Personal Computer (PC) and a physical Android device.
Cross-Platform automation within one framework is hard to do. That is why testing is often done by humans. This means it is expensive. Both in working hours and also for elaborate setups with multiple devices.
We will show you a way to automate cross-platform based on visual selectors and Operating System (OS) automation (Clicks/Taps, mouse movement, keystrokes.). Getting you started on your journey to real Cross-Platform UI Automation.
Setup
For the setup of this tutorial, we need to do two things:
Set up your Android device
Set up our GitHub account with the Android device as a second factor
Android Device
We need to enable USB debugging, install the LastPass Authenticator app, and enable screenshots for it. So let's do that now.
Lastpass Authenticator App
You have to install the LastPass Authenticator app from the Google Play Store.
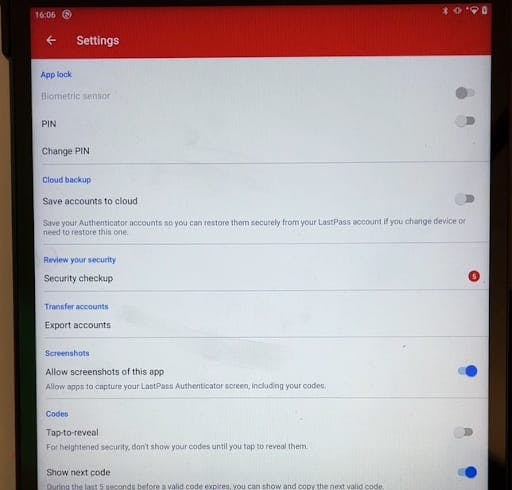
Enable Screenshots in the LastPass Authenticator App
Open the app. Go to the settings of the LastPass Authenticator app and enable screenshots.
Enable USB Debugging
Next, we have to enable USB debugging on the device. Depending on your Android version and the manufacturer of the device, this always is a little bit different. So I'll show you how it's done on my device.
First, head over to the settings. Then find System and scroll down to About the Tablet. Then find the Build Number and hit it seven times. A little pop-up on the bottom should show up which says: You are now a Developer! If it were always this easy to learn a new profession 😋
Let's go back to System and there should be a new option: Developer Options. Tap it and scroll down to USB debugging. Make sure it is enabled and now you're good to go to complete the setup.
Here is a video-tutorial to show it visually!
That is it for the basic setup of your Android device 🥳
Link LastPass Authenticator App to GitHub Account
You have to link your two-factor authentication of GitHub with your LastPass Authenticator app. Hop over to GitHub.com and you should see your personal page after logging in. Then click on the avatar on the right top, go to Settings, Password and Authentication and there you should be able to enable the two-factor authentication by following the instructions steps.
You should end up with something like this in your app:

And that's it! You're good to go and can start implementing the automation for askui 😎
Implement the Automation of 2-Factor Authentication with askui
If you want to follow along, clone our GitHub repository.
You'll also need a workspace ID and access token for askui, which you can get from our user portal.
If you followed the tutorial for setting up the ADB, you should also have the ADBKeyboard in version 2.0 installed.
Once you have everything set up, head over to your preferred IDE, open a terminal, and type in adb devices. You should see your device successfully connected if you connected it to your PC.

Setup askui
The first thing we want to do is download our platform-specific UI controller.
To do that, we need to run an askui test. Head over to the directory 2-factor-authentication. You will need to run npm install first. This will install all the dependencies askui needs.
Once the dependencies are installed, you need to open the file helper/jest.setup.ts. In line 15 select your display (main display is 0) and input your credentials in lines 20 and 21.
You can now run your first askui test by running npm run annotate_interactively. You can hit ESC or Command/CTRL + w on your keyboard to stop the annotate_interactively.
📝NOTE: Be aware that the first run may take longer than expected as the UiController has a few MB!
Setup the UI Controllers
We need two UI controllers, one for the Android device and one for our browser on our PC. To do this, we'll need to copy the helper/jest.setup.the.real.one.ts file over to helper/jest.setup.ts.
In the file, we'll need to put in our workspace ID and access token for the placeholder <your workspace id> and <your access token> respectively.
import { UiControlClient } from 'askui';

// Client is necessary to use the askui API
// eslint-disable-next-line import/no-mutable-exports
let aui: UiControlClient;
let auiAndroid: UiControlClient;

jest.setTimeout(60 * 1000 * 60);

beforeAll(async () => {

  aui = await UiControlClient.build({
    uiControllerUrl: 'http://127.0.0.1:7007',
    credentials: {
      workspaceId: '',
      token: ''
    }
  });

  auiAndroid = await UiControlClient.build({
    uiControllerUrl: 'http://127.0.0.1:6769',
    credentials: {
      workspaceId: '',
      token: ''
    }
  });

  await aui.connect();
  await auiAndroid.connect();
});

afterAll(async () => {
  aui.close();
  auiAndroid.close();
});

export { aui, auiAndroid };
We'll also need to start the UI controllers manually. They'll expose their service on a specific port:
For the browser 7007
For the Android device 6769
In your terminal, navigate to the correct directory for your OS.
# first, go to the folder that contains the binary
cd /node_modules/askui/dist/release/latest/

# for example, macOS
cd node_modules/askui/dist/release/latest/darwin/askui-ui-controller.app/Contents/MacOS/
Start the UI controller for your Android device by running:
./askui-ui-controller -r android -p 6769
In a new terminal window, navigate into 2-factor-authentication and also navigate into the correct directory for your OS.
Then start your browser UI controller by running:
./askui-ui-controller -p 7007
In a further new terminal, navigate into 2-factor-authentication one more time.
You must first insert your Github-Username on line 9 and your password on line 19 of the my-first-askui-test-suite.test.ts file
Execute the test by running:
npm test command
Breaking Down the askui Code
We start by importing the UiControlClients for our browser and our Android device.
Then, we have the basic jest structure which describes a test suit, and then the test case.
import { aui, auiAndroid } from './helper/jest.setup';

describe('jest with askui', () => {
  it('Login in Github', async () => {
    ...
  });
});
Fill Out the Initial Login Form
Line 1: The first instruction is to click on the browser again to get the focus when we start our automation.
Line 2: Then we want to click on Sign In to bring up the login form from GitHub.
Line 4-10: Next, we want to type in our username into the text field that is below the text field with the label “username or email address”. Notice how we use
{ isSecret: true, secretMask: '**' }here, so no sensitive information is sent to the askui backend.Line 12: Then press ESC to lose the focus of the text field and select the password field.
Line 14-20: We want to type in our password into the text field that is below the text field with the label Password.
Line 22-23: Then we want to TAB to get focus on our login button and press enter.
This is where the browser automation stops and we have to switch to our Android device.
await aui.mouseLeftClick().exec();
await aui.click().text().withText('Sign in').exec();

await aui
  .typeIn('', { isSecret: true, secretMask: '**' })
  .textfield()
  .below()
  .text()
  .withText('Username or email address')
  .exec();

await aui.pressKey('escape').exec();

await aui
  .typeIn('', { isSecret: true, secretMask: '**' })
  .textfield()
  .below()
  .text()
  .withText('Password')
  .exec();

await aui.pressKey('tab').exec();
await aui.pressKey('enter').exec();
Get a Token from LastPass Authenticator App
Line 1: We use our Android key here to wake up the tablet if it has gone to sleep.
Line 4: Then we want to start the LastPass Authenticator App. Starting it over the UI is not too intuitive to automate. For the sake of brevity, we use
execOnShell()with the ADB. That's a little bit of a trick here 😉.Line 6-15: The text that displays our token is the first element below the GitHub text. We want to copy it and then paste it into the input field that comes up when we do the browser automation.
Line 18-24: To get the element, we're going to sort the elements based on the bounding box's ymin-coordinate. This should give us the token as the first element. We can take the first element and get its text, replacing all the new lines or spaces we find.
await auiAndroid.pressAndroidKey('wakeup').exec()

 // start lastpass authenticator app
 await auiAndroid.execOnShell("monkey -p com.lastpass.authenticator 1").exec()

 await waitUntil(auiAndroid.expect().text().withText('Github').exists().exec())

 const codeElements =
   await auiAndroid
     .get()
     .text()
     .below()
     .text()
     .withText('GitHub')
     .exec();

// sort the returned elements based on their ymin
codeElements.sort(
   (element1, element2) =>
     (element1.bndbox.ymin <= element2.bndbox.ymin ? -1 : 1))

// Using code[0], so the nearest element is selected
// strip all non numeric characters from string
const code = codeElements[0].text.replace(/\D/g, '');
Type the Token Into the Authentication Form
We then type the token into the input field which contains the text XXXXXX. If the token is correct this should bring us to our personal page on GitHub 💃🏻.
await aui
  .typeIn(code, { isSecret: true, secretMask: '**' })
  .text()
  .withText('XXXXXX')
  .above()
  .text()
  .withText('Verify')
  .exec();
Conclusion
In this tutorial, you learned how to instrument two different devices on two different platforms with askui in one automation case.
With this knowledge, you can now start to write your own cross-platform automation 😎.
Get Support
If you have a recurring or persisting issue, don’t hesitate to ask the Discord community for help!