Overview
Custom Element Selection is a feature in askui that enables you to create custom selectors for elements on the screen, instead of relying on the standard selectors provided such as Button, Textfield, etc.
With this feature, you can define a custom selector based on how the element is displayed on the screen. This can be particularly useful in situations where standard selectors are unreliable due to the non-standard properties of the element. It provides greater flexibility and control, allowing you to tailor the automation to meet the specific needs of your application.
Here we will demonstrate how to use a custom element to explore Google Street View.
Demonstration
Requirements
askui - Follow this tutorial if you haven't installed it yet.
Web Browser - We use Safari in this demonstration, but you can use any web browser you have.
Understanding the customElement() in askui
customElement()is an element to look for on the screen that is defined by the user with a given image.
// Example of customElement()

await aui
    .click()
    .customElement({
        customImage: './logo.png', // required
        name: 'myLogo', // optional
        threshold: 0.9, // optional, defaults to 0.9
        rotationDegreePerStep: 0, // optional, defaults to 0
        imageCompareFormat: 'grayscale', // optional, defaults to 'grayscale'
        mask:{x:0, y:0}[] // optional, a polygon to match only a certain area of the custom element
    })
    .exec();
Arguments
customImage (
string, required):- A cropped image in the form of a base64 string or file path.
name (
string, optional):- A unique name that can be used for filtering for the custom element. If not given, any text inside the custom image will be detected via OCR.
threshold (
number, optional):- A threshold for how much a UI element needs to be similar to the custom element as defined. Takes values between
0.0(== all elements are recognized as the custom element which is probably not what you want) and1.0(== elements need to look exactly like thecustomImagewhich is unlikely to be achieved as even minor differences count). Defaults to0.9.
- A threshold for how much a UI element needs to be similar to the custom element as defined. Takes values between
rotationDegreePerStep (
number, optional):- Step size in rotation degree. Rotates the custom image by this step size until 360° is exceeded. The range is from
0to360. Defaults to0.
- Step size in rotation degree. Rotates the custom image by this step size until 360° is exceeded. The range is from
imageCompareFormat (
'RGB' | 'grayscale', optional):- The color compare style.
grayscalecompares the brightness of each pixel whereasRGBcompares all three color. Defaults tograyscale.
- The color compare style.
mask (
{x:number,y:number}[], optional):- A polygon defined by an array of points to match only a certain area of the given custom image.
Two Things to be Aware of When Using customElement()
1) Create the Custom Image by Cropping it From The Actual Screen
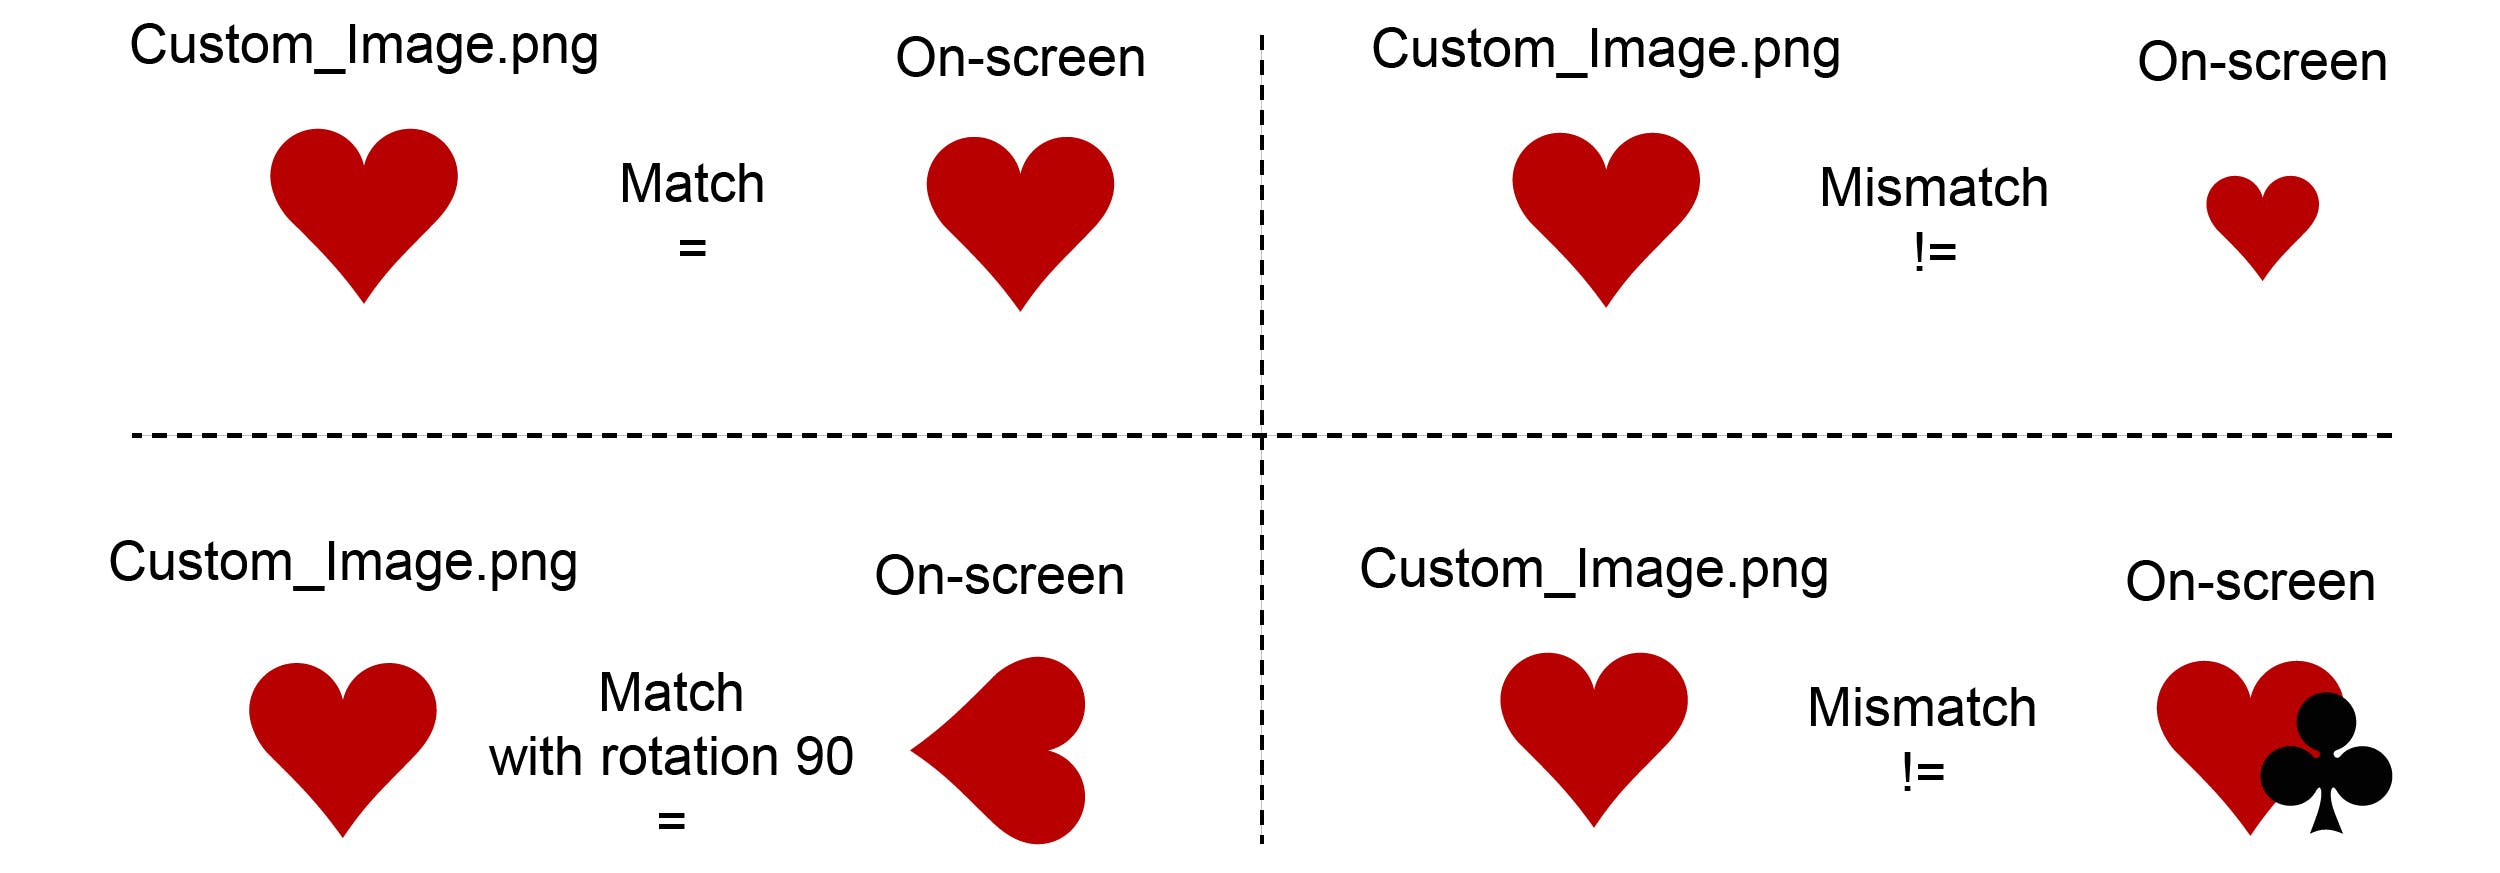
- To find a matching element from the screen, the custom image must be the same as it is displayed on the screen. By saying same in this sense, includes the size, rotation as well as the overlapping object, if there is any.

Note the left-bottom case of the illustration. A rotated element can be also matched, but only if everything else except the rotation are staying the same as it is displayed on the screen. If you can assure that your custom image is exactly the same as it is displayed on the screen + if you know the degree of the rotation, then you could consider using the rotationDegreePerStep parameter. And because askui will try to rotate the custom element for the whole revolution, a divisor of the rotated degree could be also used, e.g in the illustrated case, we can use not only
90but also45,30,15, etc. But since smaller degrees will require more iteration steps, it will increase the runtime by a notable amount.The simplest way to accomplish it might be to screen capture and crop the desired image from your screen directly. In Windows and macOS, you can use the built-in screen capture tool:
Windows: Press
windows+shift+s(Windows 10 or higher)macOS: Press
cmd+shift+4
In both cases, you will be asked to select a certain portion of the screen. On Windows, the captured image will be stored in the clipboard, so you will need to save it to an image file. On macOS, the image will be saved in the
~/Desktopby default.
2) The Time of the Execution will Increase by a Notable Amount
- To examine whether the custom image matches the given screen, askui iterates through the whole pixels of the given screen as well as the custom image. So it is likely to increase the runtime by a notable amount. Therefore, if the task could be accomplished with other filters such as
icon(),button(), ortext(), then it's maybe better to avoid using thecustomElement().
Capture the Custom Element
- In this demonstration, we will search for a certain area in Google Street View. This can be enabled by pressing a button at the right corner of the Google Maps:

Can you see the yellow tiny human in the corner? We need an image of this human figure to interact with it.
Let's make a screen capture of it. It shall look like this:

- Then save the image in your project's root directory with the name
human-figure.png. The file tree of your project's root directory will be like this:
project_root/
├─ node_modules/
├─ test/
├─ package.json
├─ tsconfig.json
├─ human-figure.png
Write the askui Code
- If you are prepared with the image above, let's jump into our code:
import { aui } from './helper/jest.setup';

describe('Explore the world in google maps', ()=>{

  it('open web browser and go to  google maps', async ()=>{

    // open the start menu/spotlight to search for the web browser
    await aui.pressTwoKeys('command', 'space').exec(); // for macOS
    // await aui.pressKey('command').exec(); // for Windows
    await aui.waitFor(250).exec(); // wait for the start menu to open

    await aui.type('safari').exec(); // type the name of the web browser
    // await aui.type('chrome').exec(); // if you are using another web browser, replace the name to it
    await aui.pressKey('enter').exec(); // open the web browser
    await aui.waitFor(1000).exec(); // wait for the web browser to open

    await aui.type('https://maps.google.com').exec(); // type the url of the website
    await aui.pressKey('enter').exec(); // open the website
    await aui.waitFor(1000).exec(); // wait for the website to load

  });

  it('search for a location', async ()=>{

    await aui.type('machu picchu').exec(); // type the name of the location
    await aui.pressKey('enter').exec(); // search for the location
    await aui.waitFor(2000).exec(); // wait for the map to load
    await aui.pressKey(',').exec(); // hide the side panel

  });

  it('enable street view', async ()=>{

    // now we look for our custom element on the map
    // move the mouse to the custom element
    await aui.moveMouseTo()
        .customElement({
            customImage: "./human-figure.png",
            name: "street-view-icon",
            threshold: 0.9,
        })
        .exec();

    // click and hold on the custom element
    await aui.mouseToggleDown().exec();

    // drag the custom element(our human) to the location we want to explore
    // note the offset of -50 pixels along the y axis
    // we drag the human 10 pixels higher than the location Aguas Calientes
    await aui.moveMouseRelativelyTo(0, -10).text().withText('Aguas Calientes').exec();

    // release the mouse button
    await aui.mouseToggleUp().exec();
  });
});
After successfully running the code, you will be able to see the landscape of Machu Picchu, the most iconic citadel of the lost empire Inca.
It is possible that you end up with a plain Google Map without having the Street View enabled. It might be caused by various reasons, but the most likely scenario is due to the different resolutions of the screen (your display can have a different resolution than mine). You could try to adjust the amount of the pixel offset that is given to the
moveMouseRelativelyTo(), for example, try withmoveMouseRelativelyTo(-5, -15).
Breaking Down the Code
1) Open the Web Browser and Go To the Desired Website
- One notable part of this step is the
waitFor()after each execution. We have used it in three different lines of this code block. Check out the respective parts and adjust the amount of time to wait until the process is finished. It may take more or less time depending on the condition of your device and internet connection:
it('open web browser and go to  google maps', async ()=>{
    // open the start menu/spotlight to search for the web browser
    await aui.pressTwoKeys('command', 'space').exec(); // for macOS
    // await aui.pressKey('command').exec(); // for Windows
    await aui.waitFor(250).exec(); // wait for the start menu to open

    await aui.type('safari').exec(); // type the name of the web browser
    await aui.pressKey('enter').exec(); // open the web browser
    await aui.waitFor(1000).exec(); // wait for the web browser to open

    await aui.type('https://maps.google.com').exec(); // type the url of the website
    await aui.pressKey('enter').exec(); // open the website
    await aui.waitFor(1000).exec(); // wait for the website to load
});
- Also, don't forget to change the key to press and the name of the web browser based on your condition.
2) Search for the Location
- Here we type our desired keyword into the textfield of Google Maps. As the textfield gets focused automatically, we can directly type in the keyword to the textfield:
it('search for a location', async ()=>{

    await aui.type('machu picchu').exec(); // type the name of the location
    await aui.pressKey('enter').exec(); // search for the location
    await aui.waitFor(2000).exec(); // wait for the map to load
    await aui.pressKey(',').exec(); // hide the side panel

});
- Note that we also press the
,(comma) key to hide the side panel of Google Maps. This is for hiding unnecessary information from the screen.
3) Drag the Human Icon to the Desired Location
Finally, we drag our human, which we defined as our Custom Element, to the desired location.
Firstly, we move the mouse cursor to our custom element.
For dragging the mouse, we use the
mouseToggleDown()to press-and-hold the mouse left button.After that, we move the mouse to the desired location.
Thereafter, we use
mouseToggleUp()to release the mouse button.
it('enable street view', async ()=>{

    // now we look for our custom element on the map
    // move the mouse to the custom element
    await aui.moveMouseTo()
        .customElement({
            customImage: "./human-figure.png",
            name: "maps",
            threshold: 0.9,
        })
        .exec();

    // click and hold on the custom element
    await aui.mouseToggleDown().exec();

    // drag the custom element(our human) to the location we want to explore
    // note the offset of -10 pixels in the y axis
    // we drag the human to 10 pixels higher than the location Aguas Calientes
    await aui.moveMouseRelativelyTo(0,-10).text().withText('Aguas Calientes').exec();

    // release the mouse button
    await aui.mouseToggleUp().exec();
});
Note the optional parameters for the
customElement(), especially thethresholdthat is set to0.9.This parameter can be set from
0.0up to1.0.0.0will consider every element on the screen as matched with the given image.1.0will examine the given elements as strict as possible, so you might end up without any matching element found.
So, the best scenario to set the
thresholdmight be:- Make the custom image to be as precise as possible (cropping from the screen).
- Keep the
thresholdrelatively higher, but below1.0
- Keep the
Conclusion
If you plan to program an automation where you have elements with non-standard properties, you might want to consider using the custom element feature of askui. But as mentioned above, keep in mind that, as a trade-off, it consumes more time than other features. Taking it into account, using a custom element to interact with the given UI can be a huge help, especially if the element lacks standard properties such as tag or appearance.
If you got any issues while following this article, don't hesitate to ask for help in our Discord Community! We are more than glad to hear about your experience and help!
